5G Home Broadband
A few weeks ago I was browsing around our big four mobile phone operators’ websites checking the progress on the UK’s 5G rollout. I was quite surprised to see a good region of coverage in my local area on Three’s website. Three offer some very reasonable SIM-only unlimited data plans, and don’t charge a premium for 5G service; so this was probably the most desirable network to offer service.
As I’ve written recently, I don’t have a particularly good option for Internet connectivity at home. I’m currently relying on a dual-setup of a particularly impacted BT VDSL (@ 30/5 Mbps) and Vodafone LTE-A (@ ~90/20Mbps); which together bridge a compromise between the relatively low throughput of VDSL and high latency/jitter of contemporary LTE.
5G sounds incredibly promising as a stop-gap high-bandwidth (in theory up to 10Gbps, but more realistically 400-500Mbps), low(ish)-latency substitute for decent fibre service in countries where last-mile fibre delivery has been frustratingly inefficient and slow. The Non-Standalone Access option means it’s fairly quick to bolt the 5G NR (“New Radio”) high-performance air interface onto existing LTE networks, so adoption is going fairly quickly.
The Overall Setup
There are complete 5G home routers in the pipeline and on the market already. They are quite expensive, generally targeted at consumers, and not very flexible. Certainly not as flexible as my MikroTik Routerboard!
I felt like building a bridge to the 5G network myself. I’ve done quite a bit of work with Raspberry Pi 4 lately (on a project I’ve yet to write up!) so that was at the forefront of my mind when I started thinking about options to bridge a USB 3 5G NR modem and an Ethernet network. The newest iteration of the Raspberry Pi has a proper Gigabit Ethernet port and USB 3 bus that don’t contend for bandwidth. Some basic experiments performing 802.1d bridging between an AX88179-based USB 3 Gigabit Ethernet and the on-board Gigabit Ethernet jack proved that wire-speed bridging is quite easily achievable.

The Hard Part
5G NR is really quite new. Modems in the typical Mini-PCIe or M.2/NGFF “data card” form factor are still not widely available. A few manufacturers have come forward with offerings, however:
- Sierra Wireless AirPrime® EM9190 - A global 5G NR + mmWave M.2/NGFF module based on a Qualcomm baseband. Expensive, but probably excellent. I’ve used Sierra Wireless modules in the past and they’ve always been solid.
- SIMCom SIM8200-M2 - A global 5G NR M.2/NGFF module based on a Qualcomm baseband. Competitive pricing, but I was a little worried about the quality of these having used SIMCom modems in the past…
- Fibocomm FM150 - A global 5G NR M.2/NGFF module based on an Intel baseband. Bit of a wildcard - I’ve never used Fibocomm gear and a few posts I read mentioned some performance issues.
- Quectel RM500Q-GL - A global 5G NR M.2/NGFF module based on a Qualcomm baseband.
I also found various sellers of modules from Chinese giant Huawei but steered clear of these just because I couldn’t find absolutely anything about them and knew they likely wouldn’t work in the same way as other Cellular modems I’ve used before.
I approached several distributors/companies and found that either they weren’t willing to deal with private persons; demanded extortionate prices (before even considering duty and taxes!); or simply didn’t reply at all1.
Eventually I found a distributor with pricing I felt comfortable with for Quectel’s RM500Q-GL modules. I ordered one and waited patiently for it to arrive.
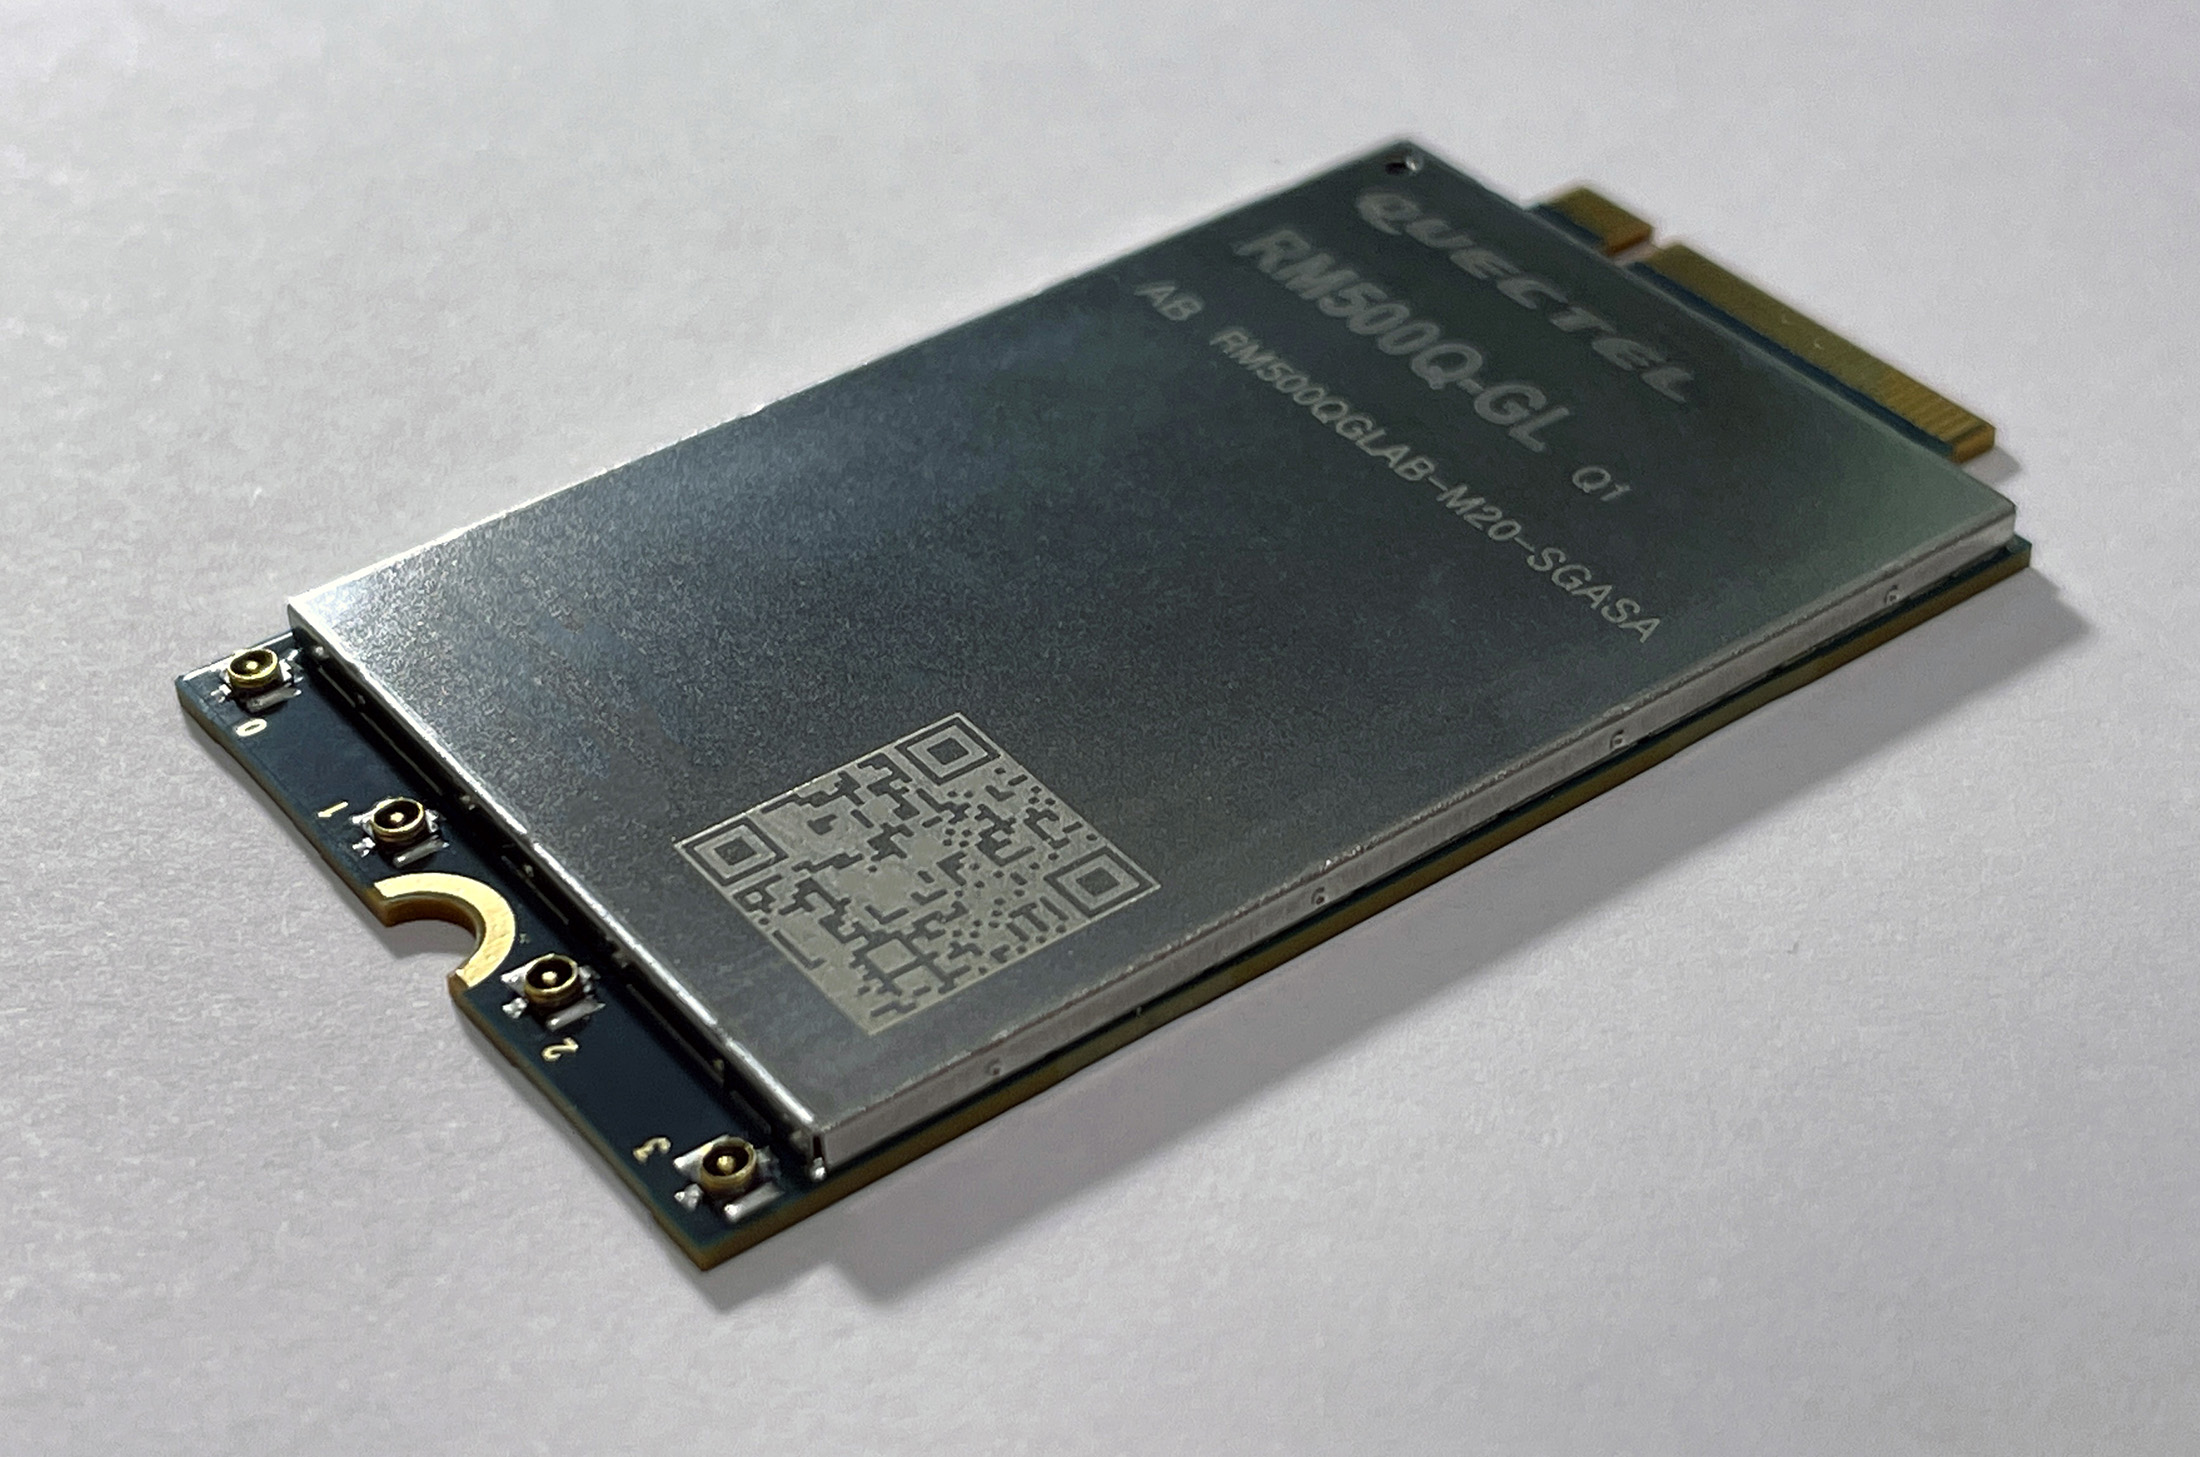
I liked the idea of using Quectel’s module since the qmi_wwan driver has explicit support for it. I also ordered a suitable USB 3.1 to M.2/NGFF (B-Key) adapter to hold my new module and make it easy to use as a USB device.
Getting Connected
Cellular modems based on Qualcomm basebands generally connect to computer/routers via USB using a protocol called QMI (Qualcomm MSM (Mobile Station Modem) Interface). Gone are the days of PPP over USB Serial connections when it comes to LTE-A & 5G - that approach just won’t deliver the many hundreds of Mbps offered by the newer cellular access protocols. The traditional AT serial interface is still available and presented as a USB CDC device that we can access using a terminal emulator like screen, but QMI exposes most of the functionality that we’re likely to need.
Much of the work to deal with QMI under Linux has, thankfully, been done. The network interface driver (qmi_wwan) is in the mainline Linux kernel, and the utilities to work with QMI devices from user space (libqmi-utils) are available on most distributions.
The first step is to install libqmi-utils so that we can work with the QMI device from the command line with qmicli. This is a slight problem because (at the time of writing) versions of libqmi that can handle 5G NR haven’t quite made it into package repositories (Raspbian’s repos were giving me 1.22, and 5G NR mentions started appearing around 1.26. So let’s build it…
git clone https://github.com/freedesktop/libqmi.git
cd libqmi
git checkout 1.26.6
./autogen.sh
make
make install
We should now have a recent libqmi and associated utilities installed.
Hopefully we can now talk to the modem with qmicli using the appropriate USB CDC character device file:
qmicli --device=/dev/cdc-wdm0 --dms-get-manufacturer

[/dev/cdc-wdm0] Device manufacturer retrieved:
	Manufacturer: 'Quectel'
Yeah! We can query the IMEI number:
qmicli --device=/dev/cdc-wdm0 --dms-get-ids

[/dev/cdc-wdm0] Device IDs retrieved:
        ESN: '0'
        IMEI: 'XXXXXXXXXXXXXXX'
        MEID: 'unknown'
    IMEI SV: 'XX'
And the moment of truth - check that we’re registered on a 5G NR network:
qmicli -d /dev/cdc-wdm0 --nas-get-system-infoWe can also check the serving cell information with an AT command:
> AT+QENG="Servingcell"
< +QENG: "servingcell","NOCONN"
< +QENG: "LTE","FDD",234,20,XXXXXX,52,1392,3,4,4,XXX,-97,-11,-61,9,-
< +QENG:"NR5G-NSA",234,20,160,-74,310,-11
A brief aside for some history - QMI used to operate by emulating an Ethernet device. That is to say that QMI carried Ethernet frames containing the underlying IP/ARP/DHCP/etc packets between the cellular modem and the host device. This was called 802.3 mode. An alternative mode of operation, raw_ip mode works by carrying the plain IP/ARP/DHCP/etc packets between modem & host without any Ethernet framing present. This is now the norm with newer Qualcomm modems, and 802.3 mode is slowly being deprecated. It is important that the host knows what encapsulation mode to expect, however. This option is exposed by the driver as a sysfs file. This is explained very well in a commit message2 by the driver’s contributor, Bjørn Mork.
Setting the encapsulation mode for the QMI protocol is easy:
echo Y > /sys/class/net/wwan0/qmi/raw_ipWe can find out the name of the interface associated with our modem. In most cases, this is usually wwan0 but might be different, so the output should be checked not assumed:
qmicli -d /dev/cdc-wdm0 --get-wwan-ifaceNow we can bring the interface up:
ip link set dev wwan0 upWe can use the qmi-network helper script to connect based on a configuration file rather than having to specify the APN details each time. To do this, we need to set the APN details in /etc/qmi-network.conf:
APN_NAME=three.co.uk
APN_USER=
APN_PASS=
We can then (hopefully) start the network:
qmi-network /dev/cdc-wdm0 startAt this stage, we’ll have an active packet data session but are yet to get the IP address from the modem. A technicality - the modem actually has an IP address at this point, and we can find it out using qmicli and just set that statically on our wwan0 interface if we want.
For convenience however, the modem will also act as a DHCP server and allow us to obtain a lease using a DHCP client instead. An advantage of this is that we can stay up to date if the IP happens to change over time. It also has the advantage that a default route is added automatically for us once the lease is acquired. A slight hinderance is that most DHCP clients are implemented in such a way that requires Ethernet framing. Remember earlier we said that this isn’t a thing anymore with QMI, so we’ll need to use a DHCP client that can deal with Raw IP. udhcpc (which you may need to install) fits the bill, thankfully:
udhcpc -q -f -i wwan0Our interface will now be configured, and a default route added for outbound traffic.
ip address wwan0If you’re anything like me, you’ll be itching to install speedtest at this point and check out what sort of numbers you’re getting! I recommend Ookla’s official client for speedtest.net rather than the open-source clients floating around (I noticed the open source versions gave me significantly lower results even using the same servers for some reason).
$ speedtest

   Speedtest by Ookla

     Server: Mauritius Telecom Ltd - London (id = 17418)
        ISP: Three
    Latency:    34.44 ms   (0.69 ms jitter)
   Download:   701.55 Mbps (data used: 1.2 GB)
     Upload:    82.46 Mbps (data used: 91.9 MB)
Packet Loss:     0.0%
Incidentally, this first speed test was when I noticed just how much heat the modem kicks out. After sustained uploading in particular, the top case of the module became uncomfortable to touch.
This was also the time I noticed the 5V USB power rail dipping during intensive upload/download activity, often to the point where the module would brown-out. The Pi has a global 1.2A limit shared across all four of the USB A ports. I ended up having to use a modified dual-power USB 3.0 cable to ensure power rail stability. I cut off the power-only male USB-A connector and replaced it with an inline fuse and a 2.54mm female header to plug onto the 5V Raspberry Pi GPIO pins, which are not subject to the same 1.2A limit. This is a little naughty though as the other ports now technically have no current limiting (other than the Pi’s supply protection).
Putting it in a Box
With the initial testing of the module proving successful, I decided that in the “just a board with a USB cable connected” form, the whole 5G modem assembly is a little fragile - especially the tiny MHF4 antenna connectors. After all the screen-time figuring out libqmi, some hands-on work building a case for the modem felt like the perfect side-project.
I did spend a little screen time initially in Fusion 360 designing the assembly around a case I found on RS from Japanese manufacturer Takachi Electric Industrial. As I mentioned above, the system gets really hot so cooling was another consideration - I opted for an appropriate size heatsink and a nice quiet 40mm fan from Austrian fan fanatics Noctua.
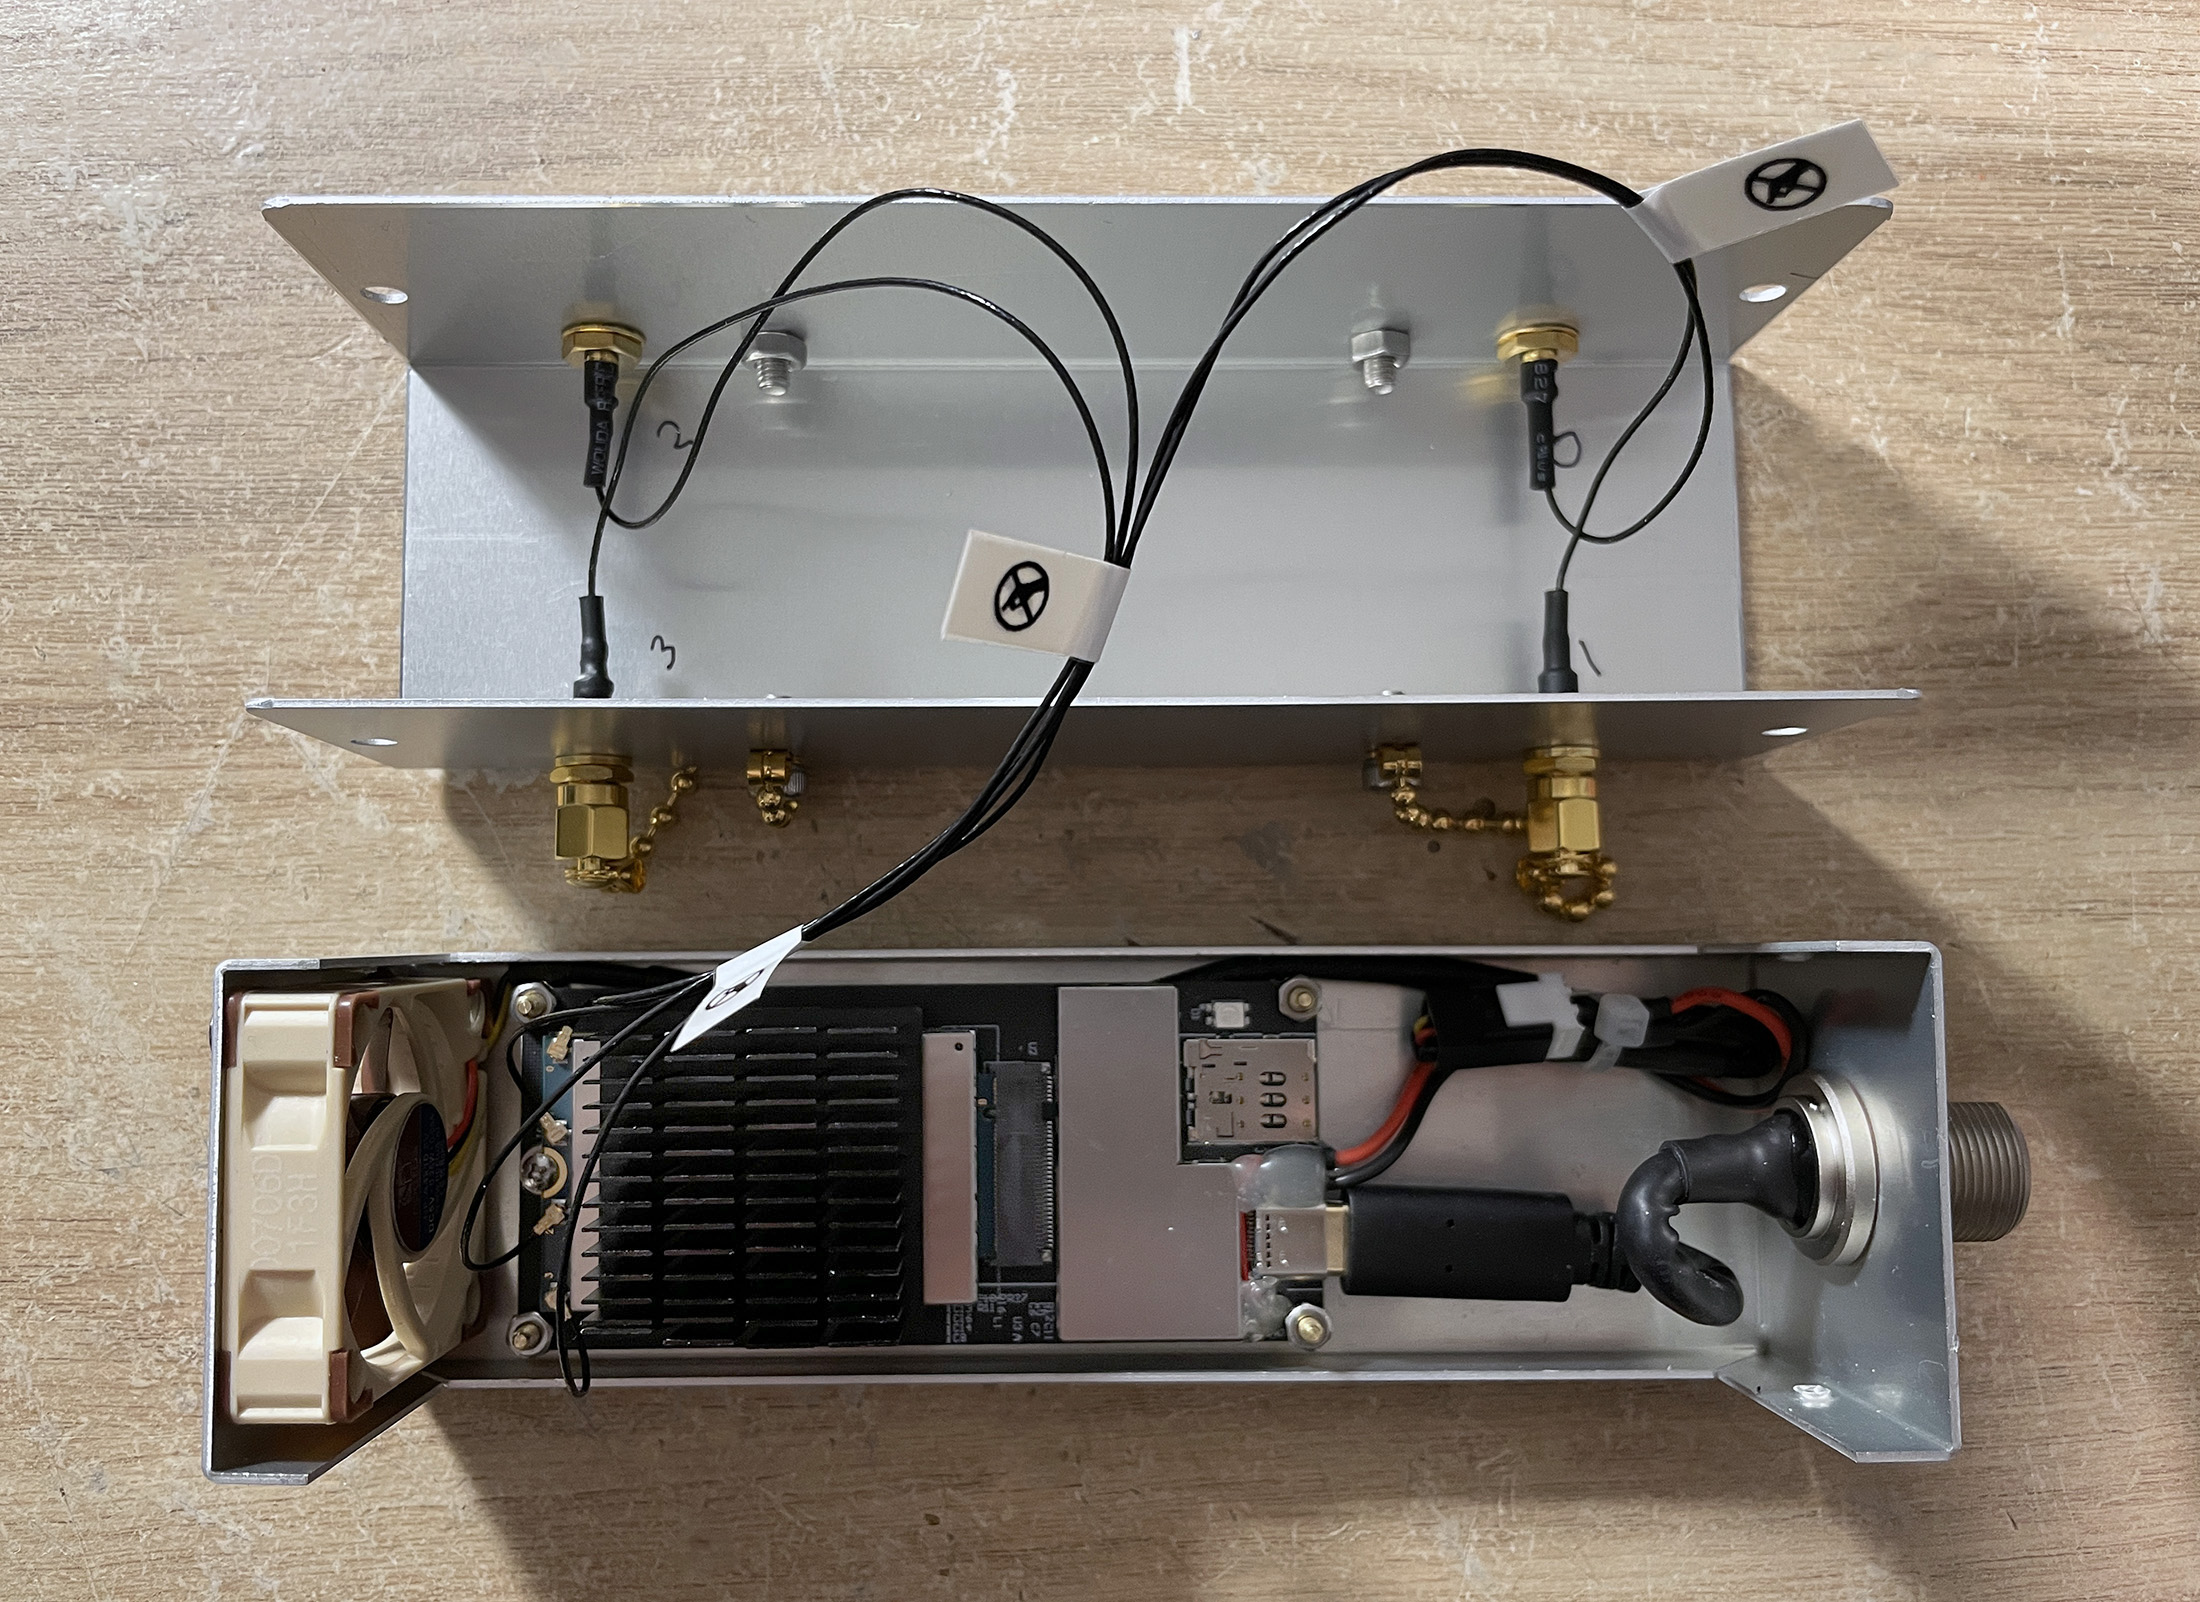
For the connections to the outside antennas, four SMA to extra-fiddly MHF4 RF pigtails fit the bill. The USB connection to the outside was something I pondered over for a while. The solution I settled on was an (annoyingly expensive) bulkhead USB-C connector from Farnell. I originally looked at options on Amazon but it was difficult to tell if they had all the required USB 3.0 SuperSpeed lanes wired (which I needed for >480Mbps transfer speeds).
Some liberal use of hole cutters and some wiring to the 5V test point on the M.2 adapter board for the fan power supply later and I had an assembled case:
Configuring NAT
To get the rest of my home online via 5G, I originally intended to bridge (at the link layer) the Ethernet and Cellular interfaces so that my main router (MikroTik Routerboard) can do the DHCP and obtain the cellular IP itself.
Unfortunately I found that’s not possible because of the way the qmi_wwan driver, and more generally QMI itself work. The QMI link is effectively P-t-P and thus has no framing (no Ethernet headers) at all. It’s just packets (most likely raw IP) being transported over QMI/USB. This means the interface can’t participate in an 802.1d MAC bridge by definition. Obviously. Doh.
The next-best alternative to this is IP NAT. I normally try to avoid NAT where I can, but it doesn’t particularly matter to us in this case, since there are already at least two layers of NAT taking place. We have no control over the CGNAT performed by the cellular network so we can just forget about handling traffic that arrives on the wwan0 interface. Check out my previous post for more on this! All that we need to do is configure traffic leaving on the wwan0 interface to be masqueraded, meaning packets will have their source IP rewritten to be whatever the current IP of wwan0 is. Standard Source-NAT (srcnat) isn’t good enough since the IP assigned to wwan0 by the cellular network isn’t fixed and may change over time.
iptables -t nat -A POSTROUTING -o wwan0 -j MASQUERADEWe can save a copy of these rules once we’re happy they are doing what we want:
iptables-save > /etc/iptables.rulesWith an entry in /etc/rc.local we can have the system reload these rules at each reboot:
iptables-restore < /etc/iptables.rules We also need to enable IPv4 forwarding in /etc/sysctl.conf, since we need to allow forwarding of traffic arriving on eth0 out of wwan0 and vice versa:
net.ipv4.ip_forward=1Automation
I found that manually bringing up the data context with qmi-network and then starting udhcpcd was a little cumbersome and didn’t recover well in the event that the cellular signal was lost, or something else went wrong.
Quectel actually provides a tool called QConnectManager / Quectel_CM3 that wraps up the functionality of bringing up the interface and obtaining IP settings. I wrote a little Python application that does a few things:
- Launches & maintains a
Quectel_CMinstance, restarting it if it dies or if the Internet connection appears to go away for too long. It also collects the log output from Quectel_CM in a rolling buffer. - Periodically polls the modem AT interface with some AT commands to retrieve the registration state and signal quality information, as well as the temperature of the module.
- Serves up a simple Flask web app that displays all the collected data, logs and also provides an interface to force-restart
Quectel_CM.
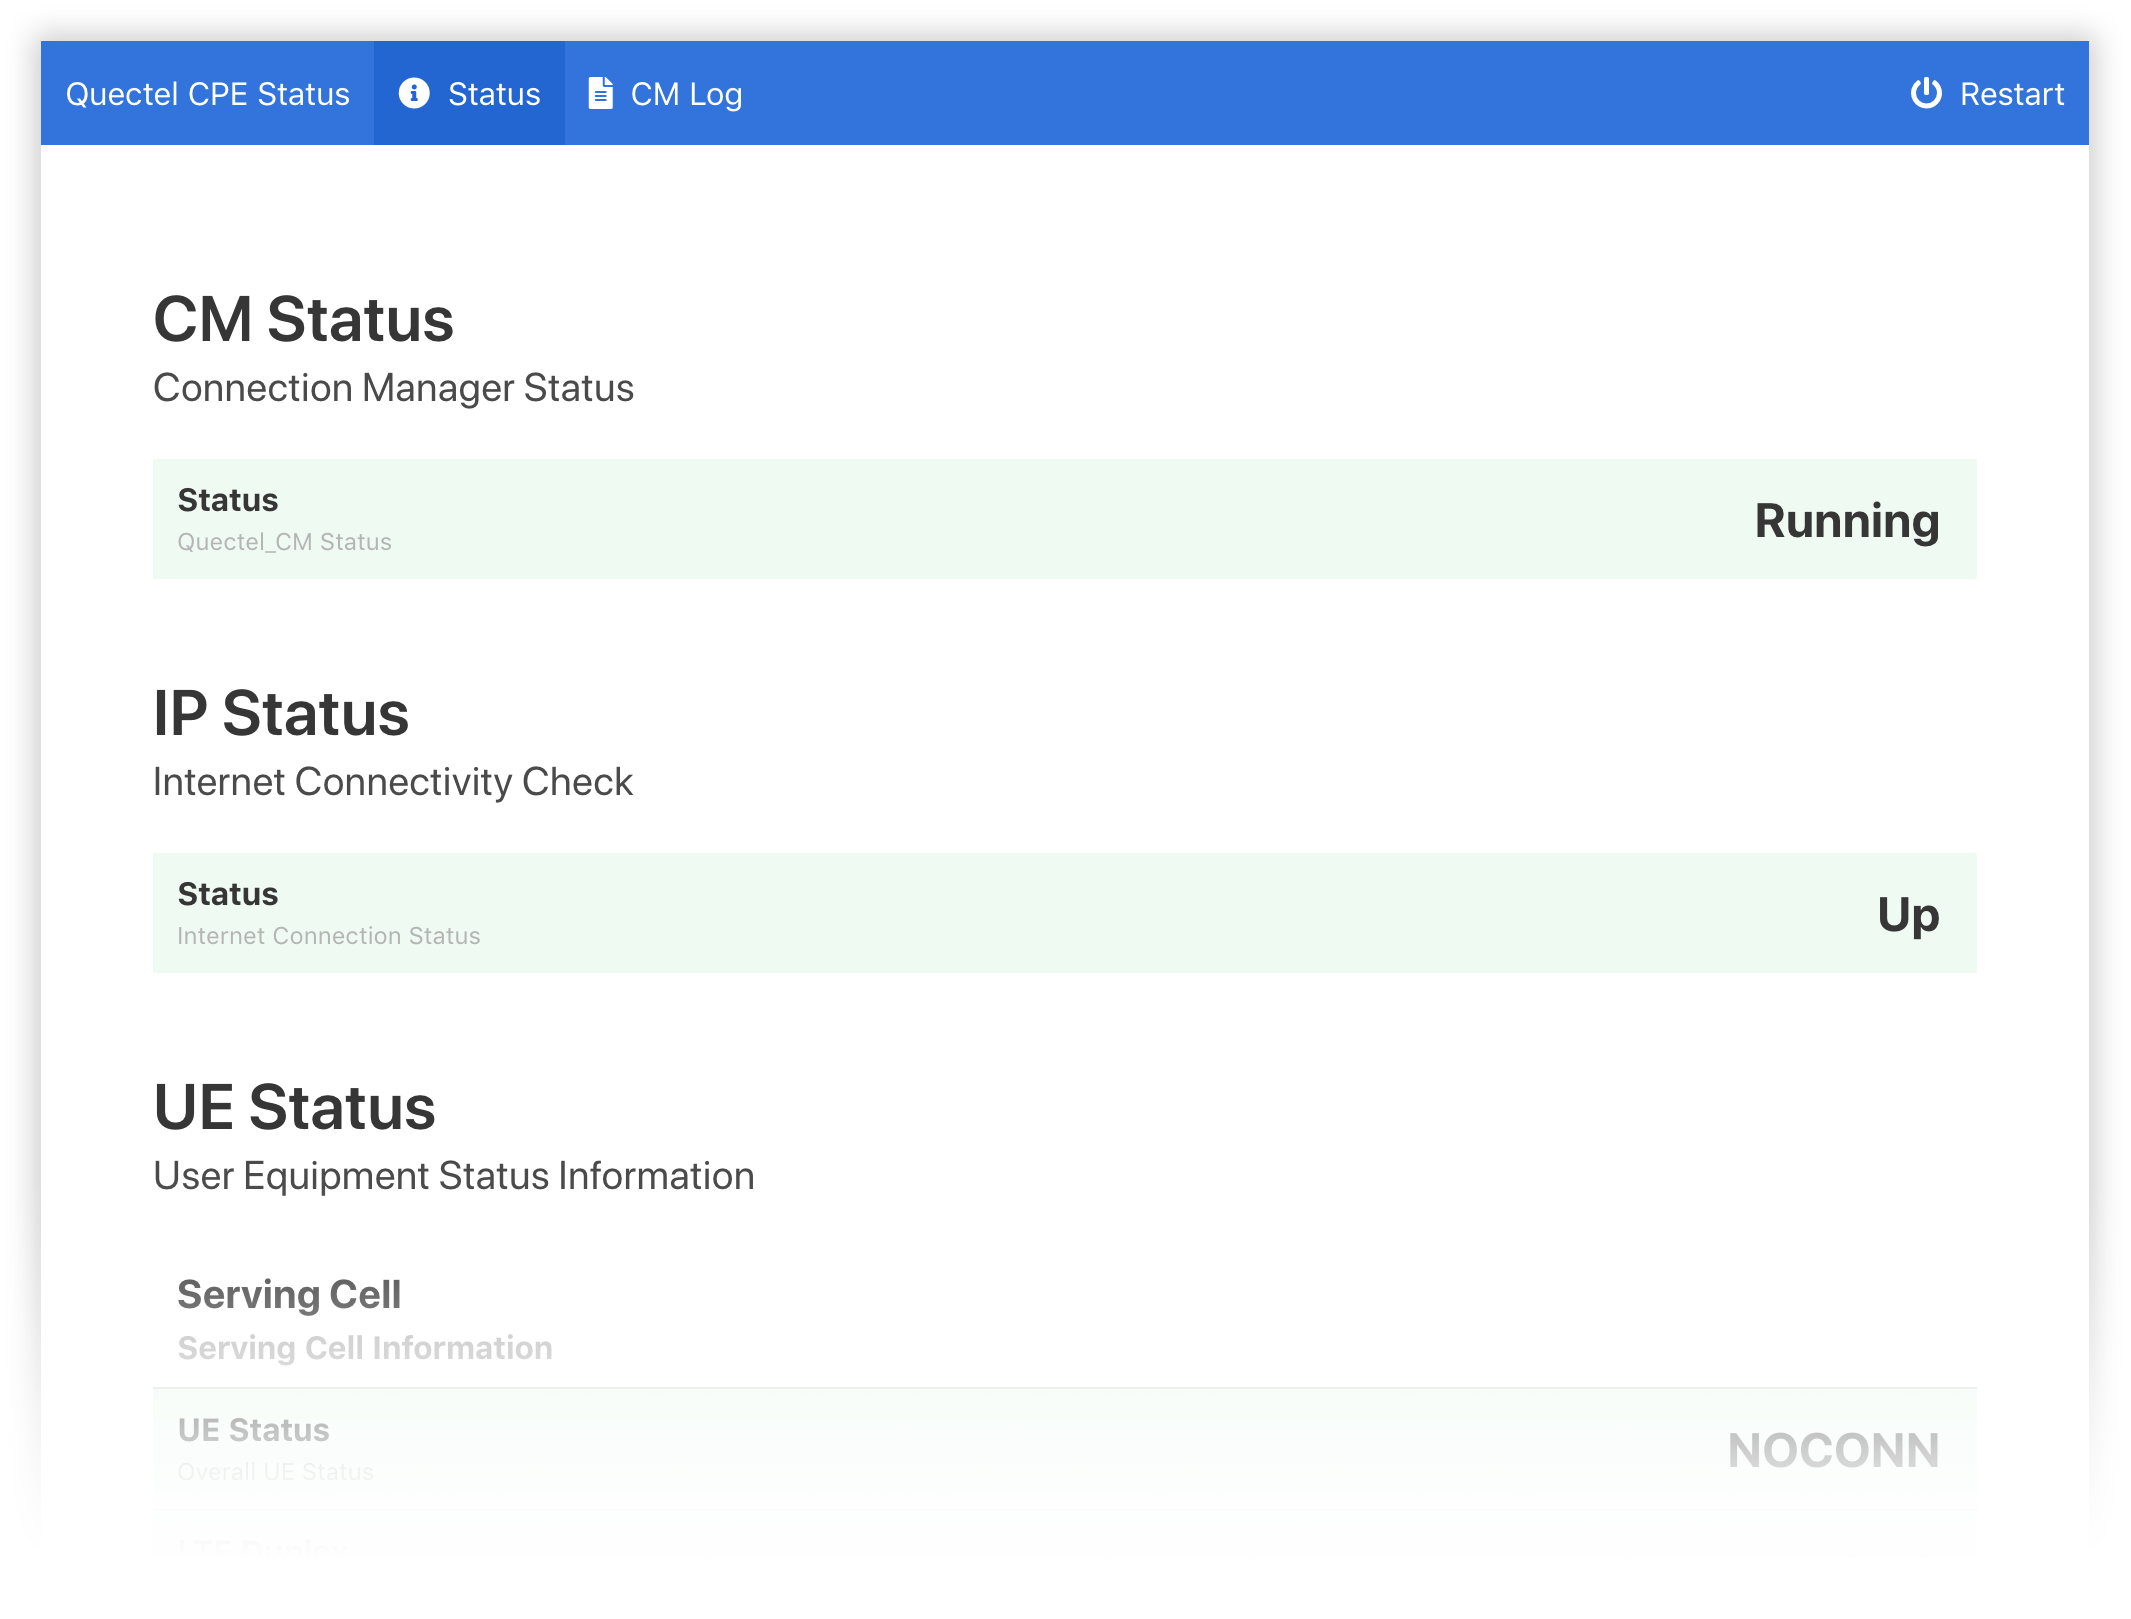
This is available on my GitHub. It’s a bit scrappy but does the job for the time being.
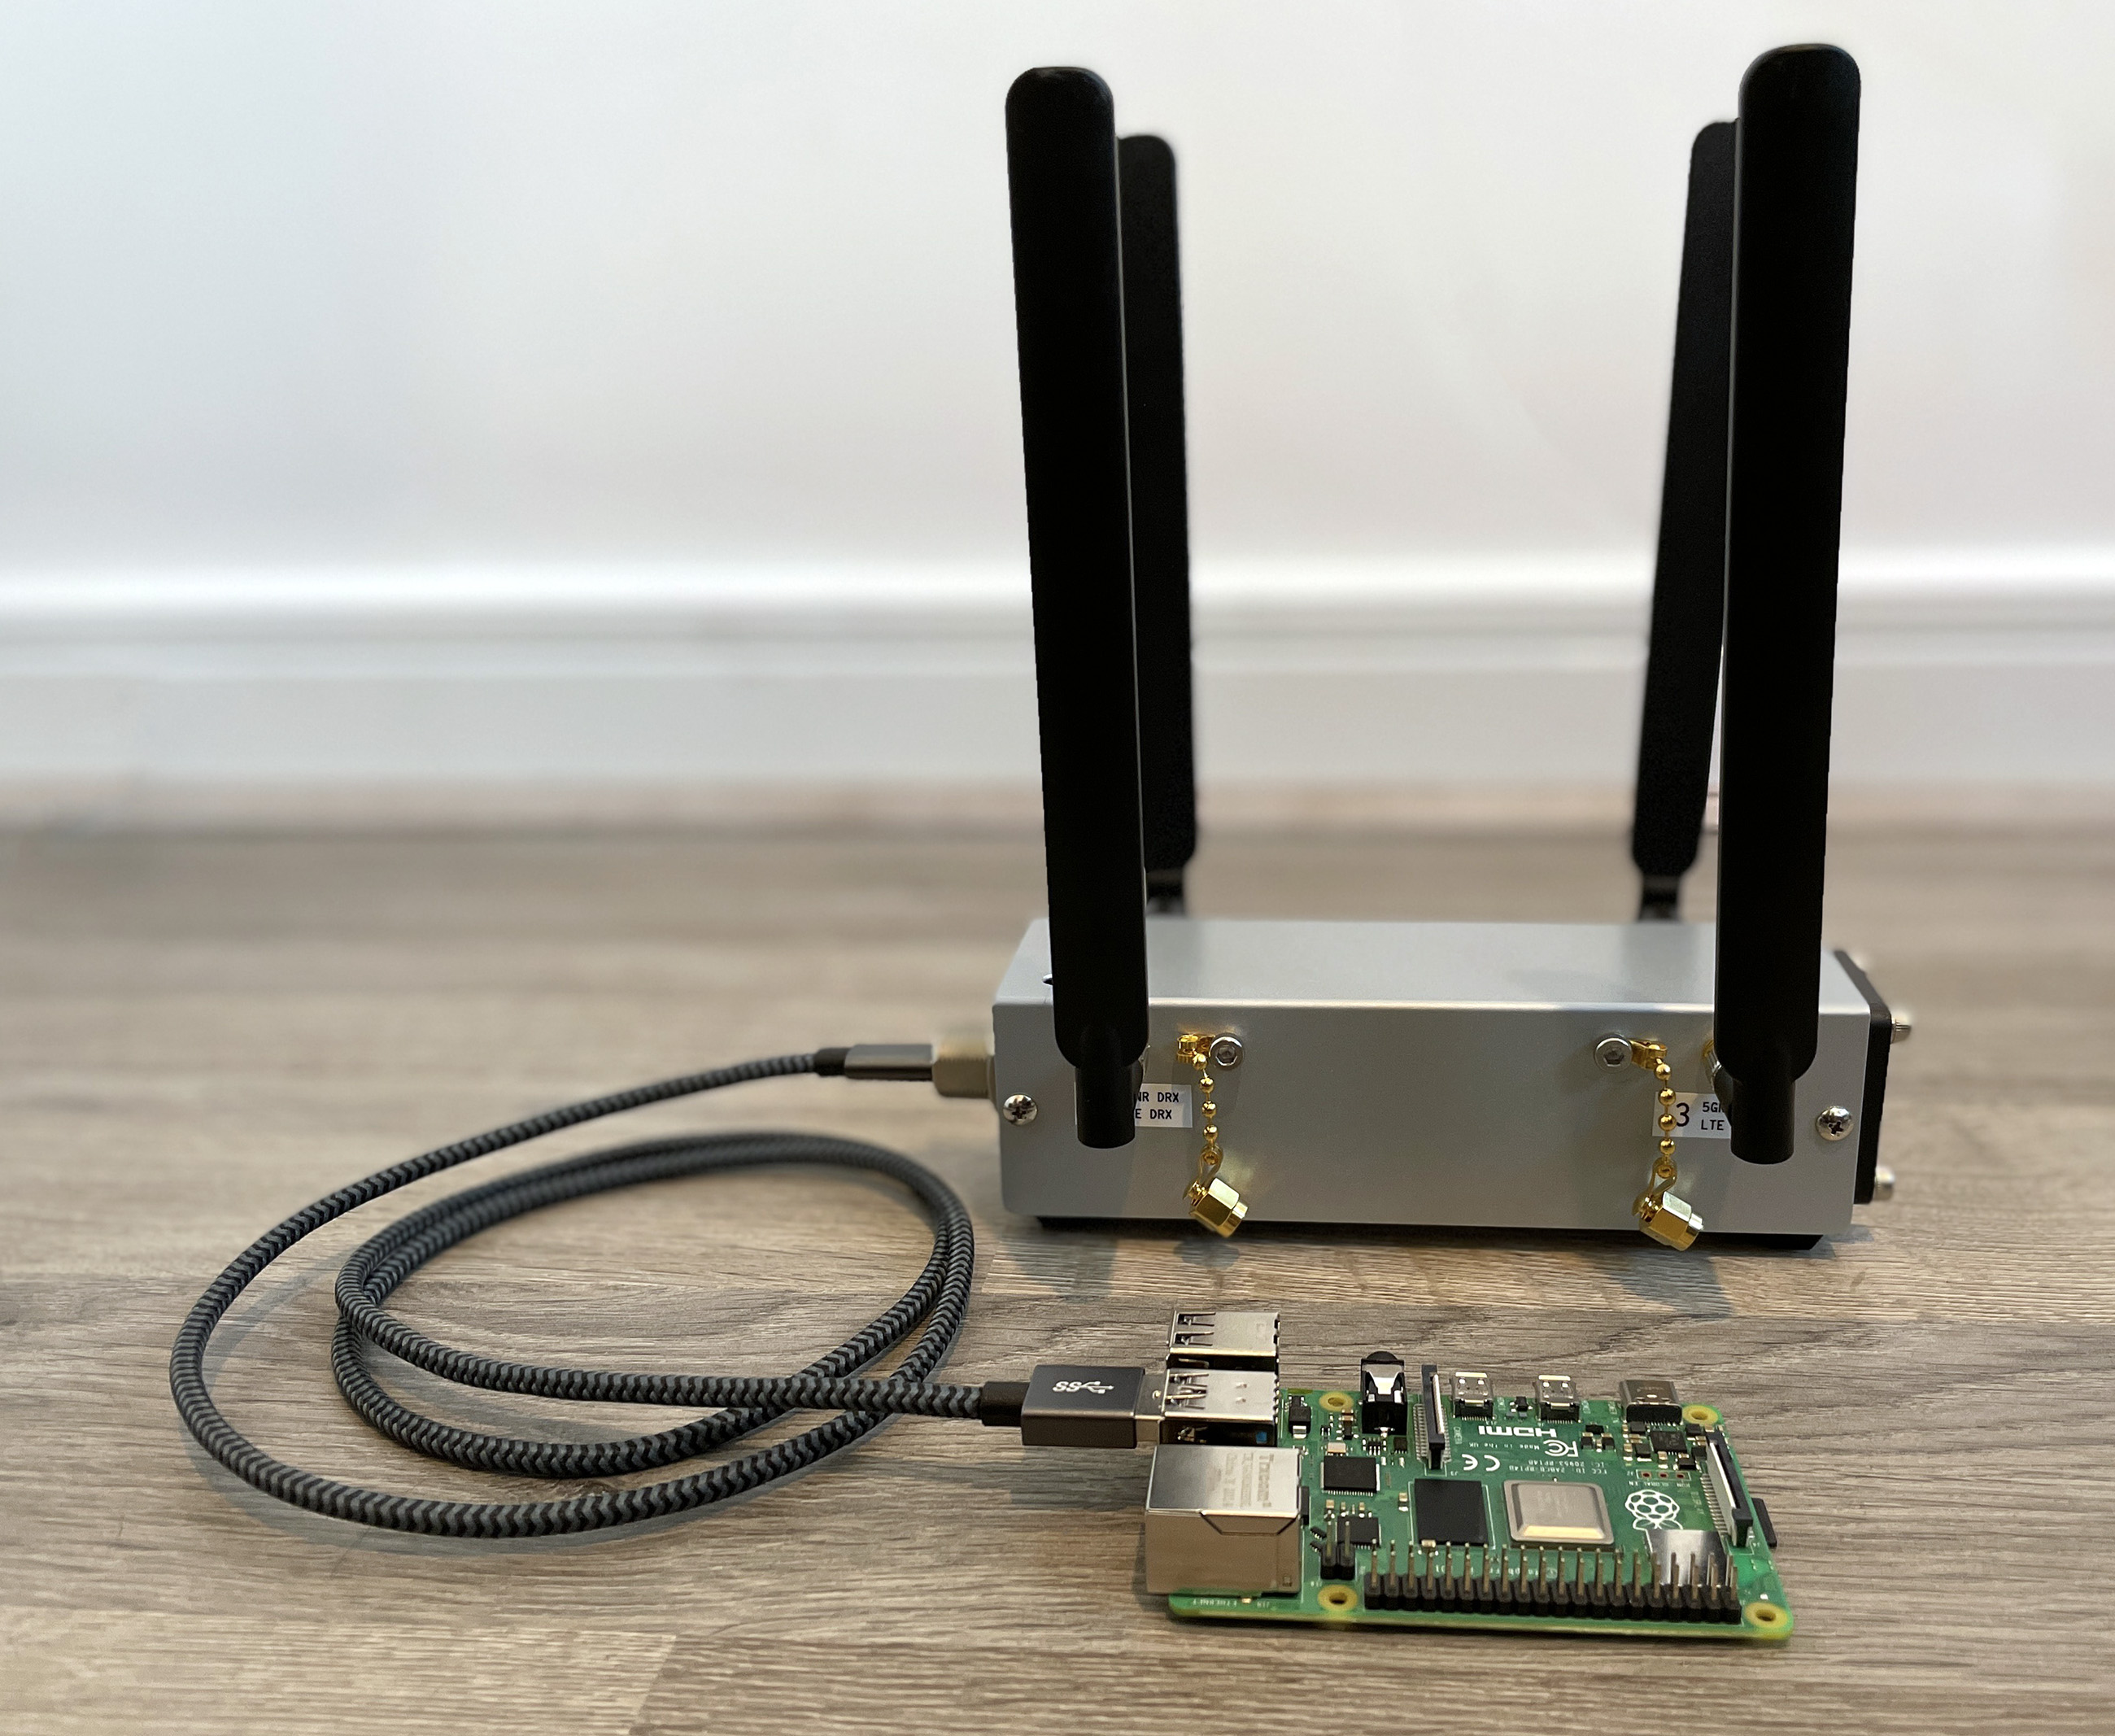
A bit of VLAN fiddling & configuration on my MikroTik router, and I had a 5G-speed connection throughout the whole house. I ended up positioning the modem and Pi up in the loft as this is by far the location with the best 5G reception.

I’m still waiting for some proper 5G antennas but results are already quite impressive. Until next time, stay safe!
-
Another infuriating aspect of looking for these modules and associated hardware is the huge overloading of the term 5G.
5GHz Wi-Fi. LTE-A being referred to as 4.5Gor even just straight-up 5G. It’s really unfortunate. ↩ -
Explanation of the transition from 802.3 framing to raw-IP in QMI https://lkml.org/lkml/2020/9/11/933 ↩
-
I can’t directly provide
Quectel_CMbecause I’m not sure of the licensing arrangements around it, but the staff at the Quectel Forums are really helpful if you’re looking for tools/drivers etc. Have a search. ↩