Dump Your Router
After building my home server, I decided to restructure my network around my newly-obtained hardware. I fancied having a crack at replacing my ISP-provided router with a PC-based one, as well as replacing the Wi-Fi component with a more reliable one.
Why?
My Internet connection at home is provided by BT. It arrives at my house in the form of a VDSL connection via a standard copper pair telephone line. To utilise the connection, BT provide a single router-like object (“Home Hub”) that rolls NAT, firewall, Wi-Fi and the VDSL modem itself into one device. It is designed to satisfy most basic daily usage requirements. It provides some basic functionality like port forwarding, DMZ, configurable Wi-Fi (with WPA2/PSK security) and the rest. Usual stuff. Unfortunately, it’s more notable in terms of what it lacks than what it offers.
Firstly, there’s no option to change DNS servers. This is a massive issue. I don’t think ISPs should be allowed to lock users out of this important configuration option on their bundled routers. By default, the Home Hub will resolve DNS queries sent to it on the LAN interface. It will use DNS servers provided by BT. These aren’t configurable. Their behaviour is controlled entirely by BT. They may log queries you make. They may return advertisement redirects in place of NXDOMAIN responses (typo-hijacking). While you can set the DNS servers on each of your devices manually, it’s far easier if you can change the one handed out by the DHCP server, or change the one used by the resolver on the box itself.
It also does strange things from time to time - including reboot itself to install firmware updates or obtain new configuration from BT. This makes running things such as 24/7-online game servers very difficult.
So, I’ve decided to bin it, and replace it with something more suited to my requirements.
Layer 1 & Layer 2 Setup
Historically, before the roll-out of ISP-provided router-like objects such as the “BT Home Hub”, VDSL subscribers in the UK would receive two pieces of equipment. The first, a CPE device provided by Openreach that essentially converted the physical layer from a twisted-pair POTS telephone circuit on the BT side to Ethernet on the customer side. For the purposes of my setup, I obtained one of these Openreach VDSL modems from eBay for around £20.
The second device was a router/firewall box provided by their actual ISP that served several purposes. Firstly, it terminated the service PPP link. Secondly, it provided IP routing between the customer network and BT’s network. It also provided NAT, firewall, DMZ and other standard functionality expected in ISP-provided routers.

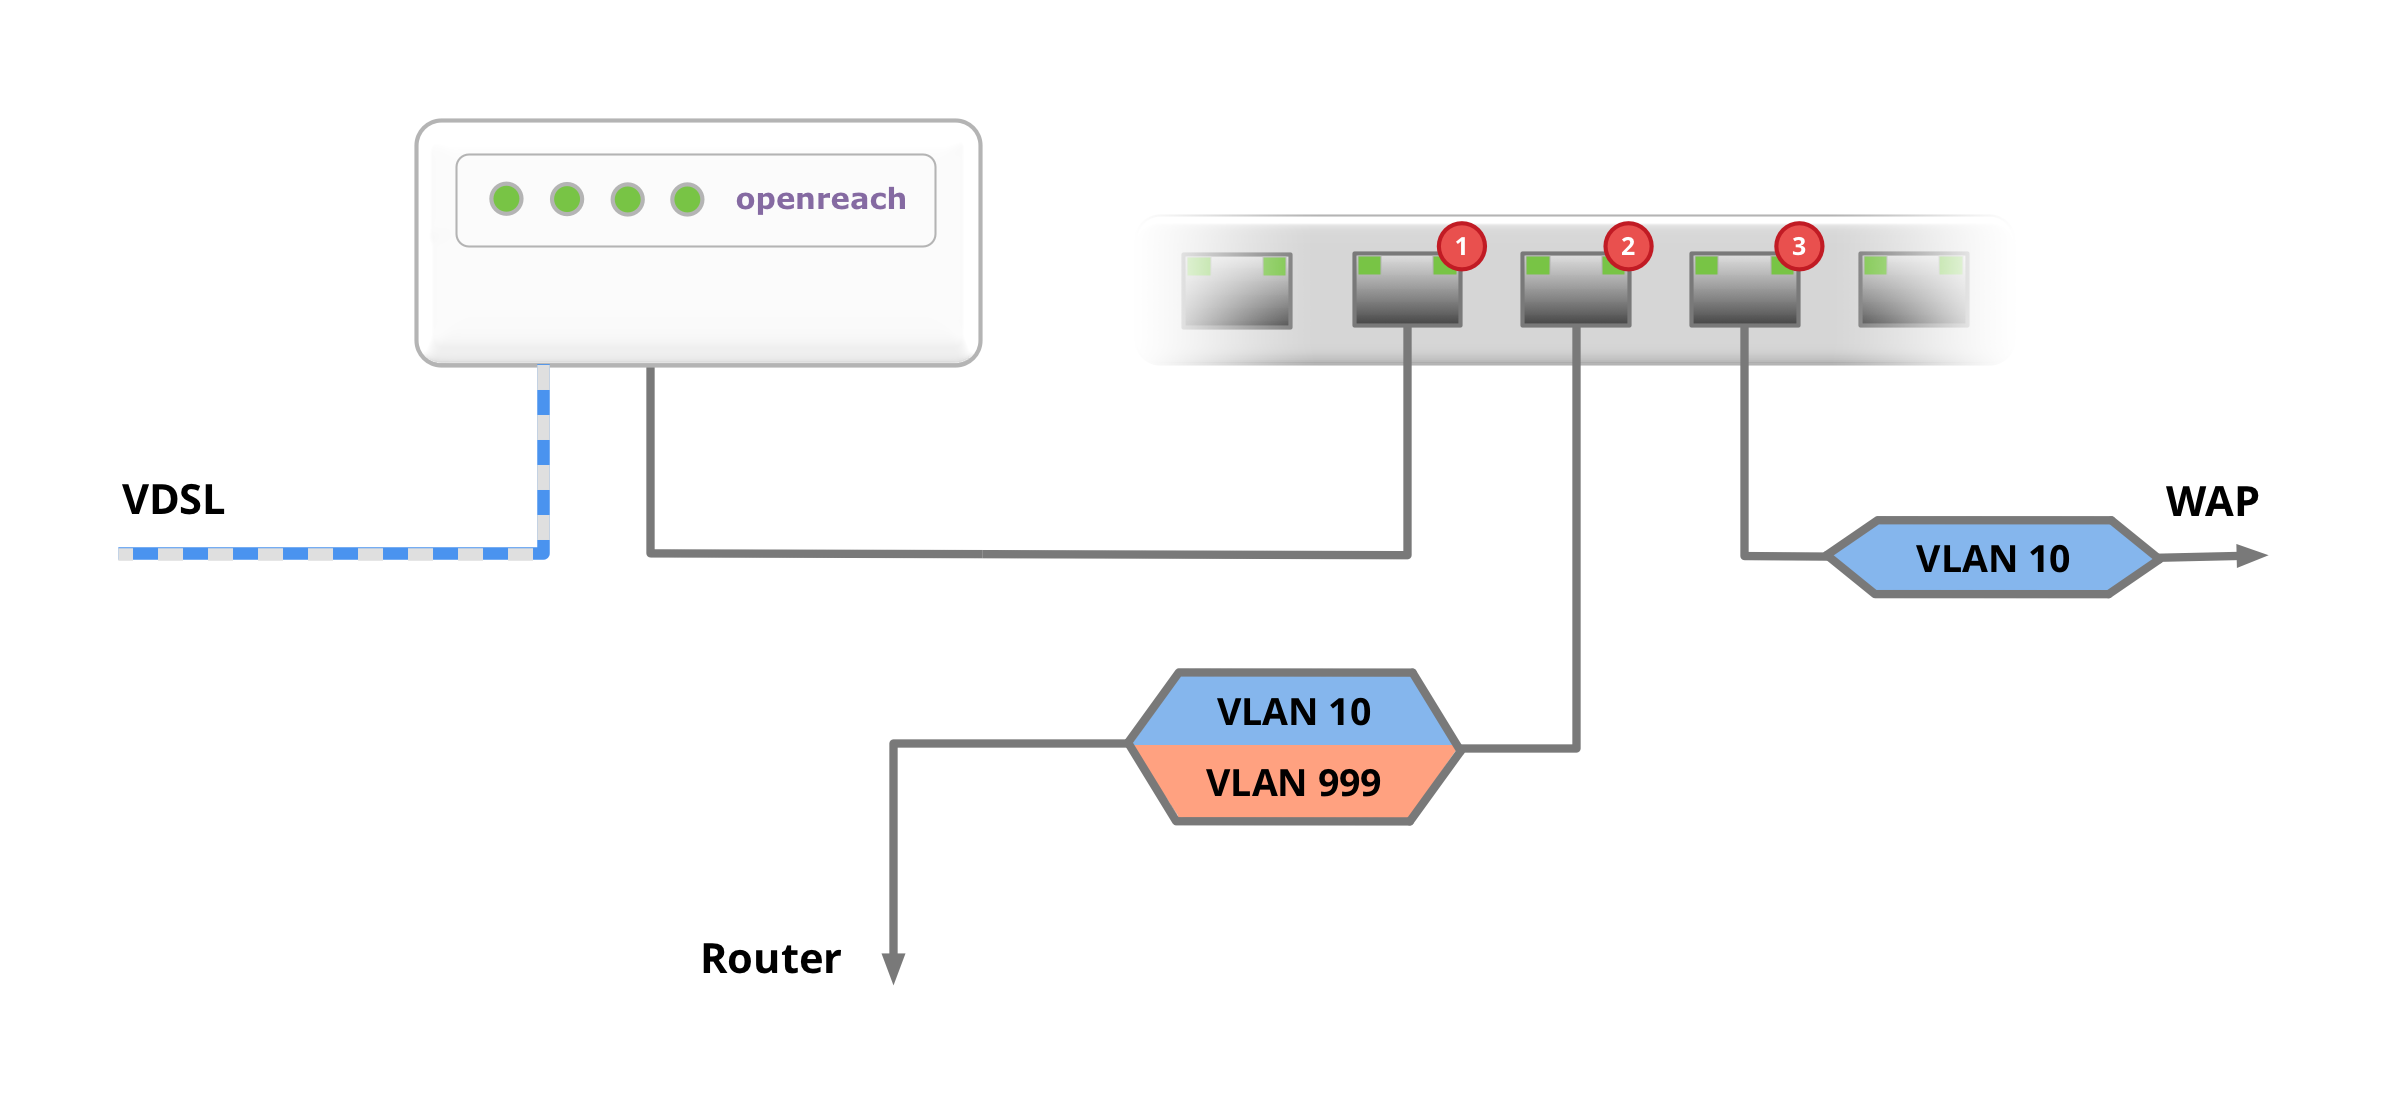
I connected the phone line to the Openreach modem and connected the Ethernet connection to Port 1 on my switch.
I set the PVID of this port to be 999. This means that packets entering this port from the Openreach modem will be tagged with VLAN 999.
I connected my VM host to Port 2. I configured the switch to trunk VLAN 10 and 999 on this port.
I connected my Ubiquiti Unifi Wi-Fi access point to Port 3. I configured the switch to trunk VLAN 10 on this port.
Setting Up the Internet Connection
To get more out of my newly-built home server, I installed VMware ESXi. This is a hypervisor operating system that lets you run multiple guest operating systems together on the same physical hardware. There are lots of articles online about installing ESXi on your Microserver, so I won’t reinvent the wheel here by writing a long post about it.
Once I had ESXi up and running, I installed pfSense as a virtual machine to replace the routing component of of the Home Hub. pfSense is a fantastic open-source firewall solution. It provides routing, firewalling, NAT, VPN; and with plugins it can provide advanced DPI-based security akin to that offered by high-end commercial firewall appliances. Again, there’s a ton of information out there about basic networking tasks with pfSense, so I won’t cover the really basic stuff here - just the tricky stuff around getting the PPPoE connection working.
In terms of resources, pfSense can be considered to be pretty lightweight for most home use purposes. My pfSense VM has two VCPUs and 2GB of RAM. I haven’t seen it use anywhere near 30% of that, and I have quite a few plugins and additional services running.
Create the PPPoE VLAN
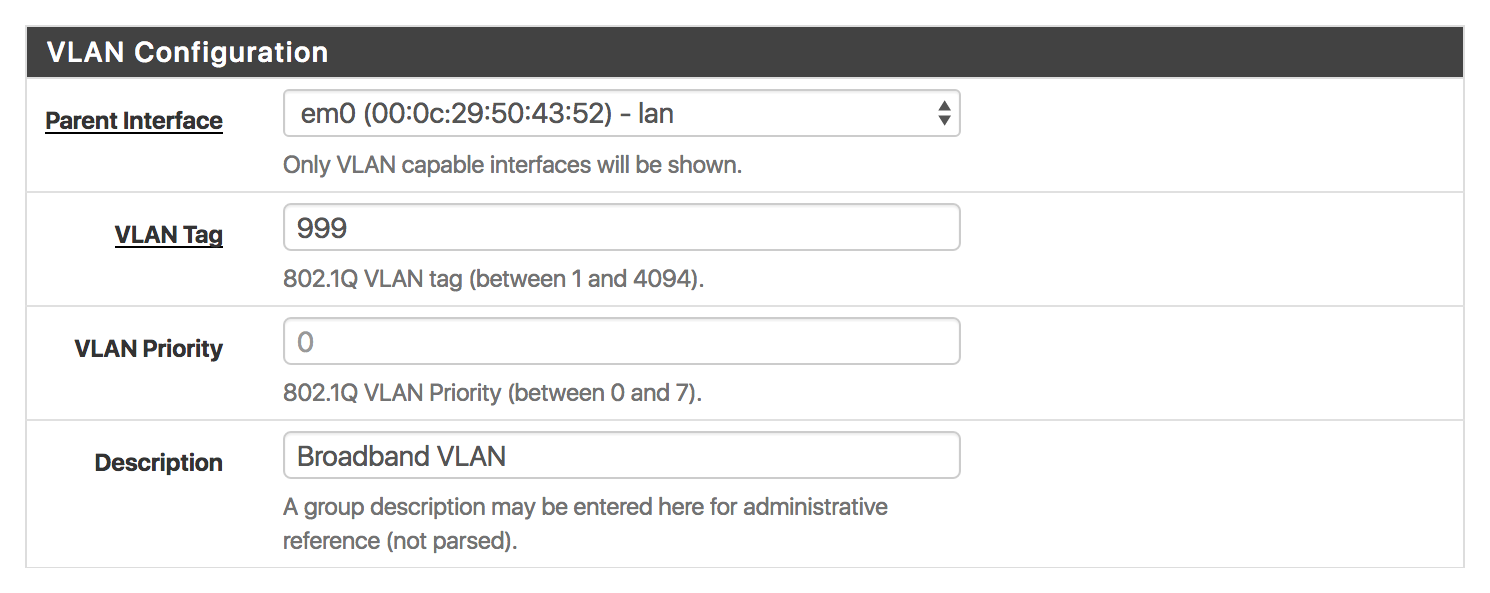
The first step was to create a virtual network port for the VLAN that will carry the PPPoE connection in Interfaces → VLANs → New.

I also created another VLAN - 10 - for Wi-Fi users in the house.
Just a note here, it’s quite possible to manage all this at the ESXi level (essentially having virtual network interfaces appear for each of the VLANs you need). I chose not to go down that route because it requires you to reboot the pfSense VM every time you want to add a VLAN. Trunking all VLANs into the pfSense VM and then sorting them out there seemed easier.
Create the PPPoE Connection
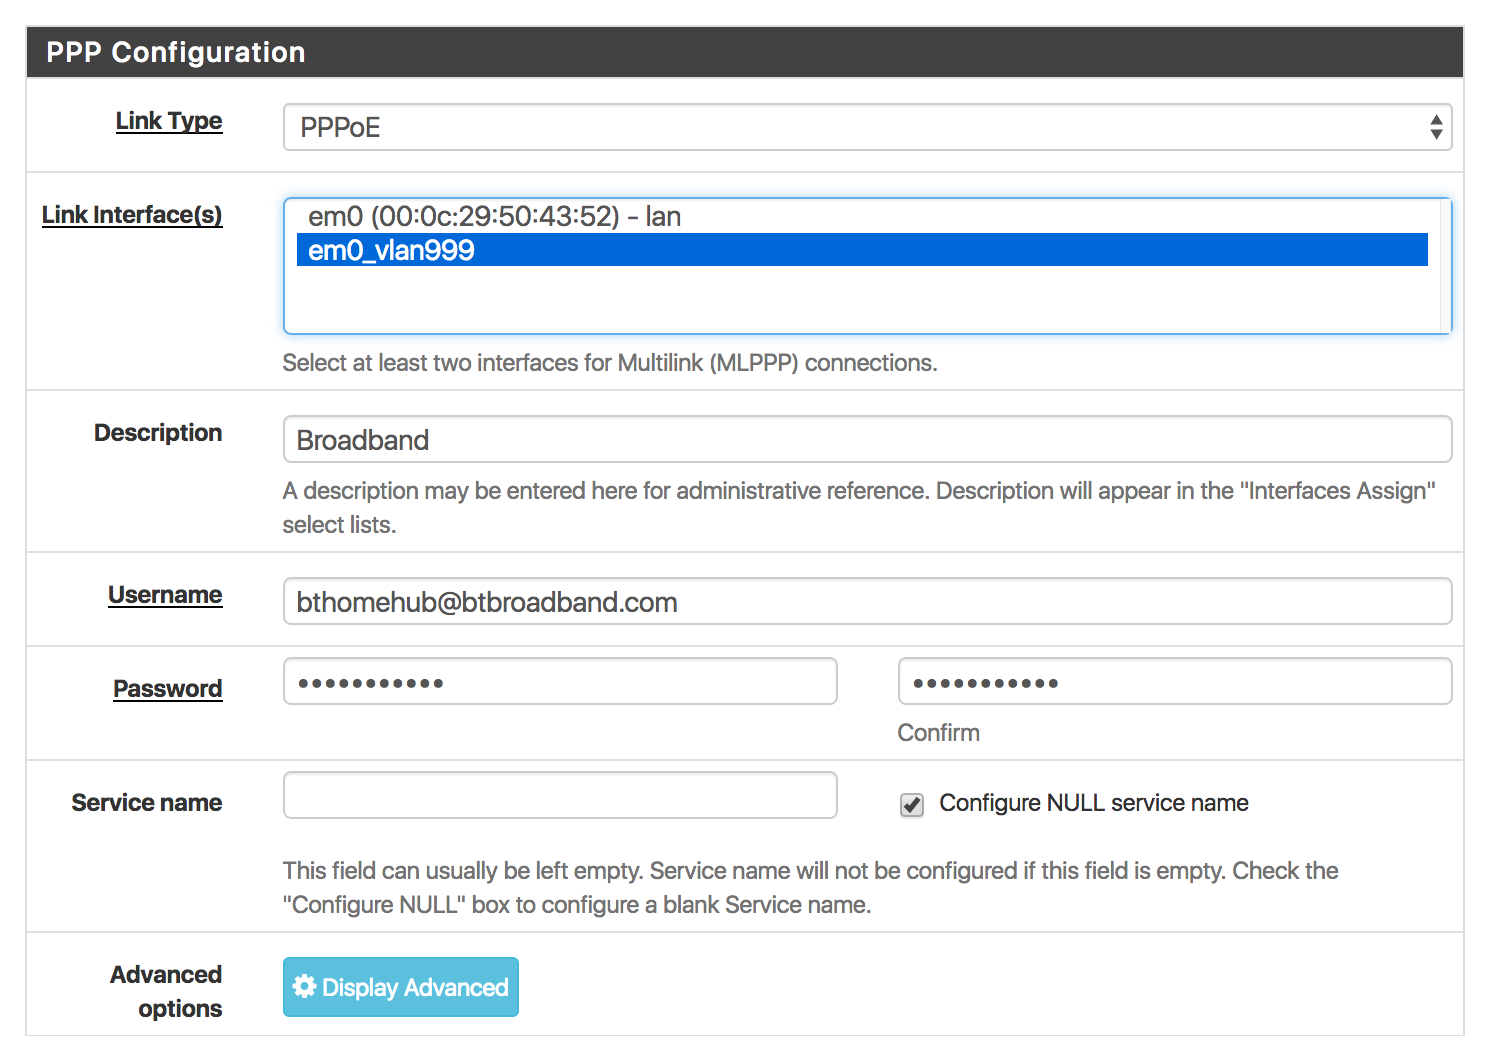
Once the VLAN was created, I created the PPPoE connection on top of the new 999 VLAN.

The details for your broadband connection may be different, BT do not seem to care in my case. Any username and password may be used.
Assign Interfaces
Next, I assigned an interface (in Interfaces → Interface Assignments) to the PPPoE network port I just created. I simply chose the new PPPoE connection from the drop-down list next to the pre-existing WAN interface and clicked Save.
If everything’s set up, at this point the PPPoE interface should come up! You can check the status in Status → Interfaces.
I also assigned a new interface for the VLAN 10 network port I created for Wi-Fi users. Later on in Firewall → Rules I also created the necessary rules to allow routing between the Wi-Fi users subnetwork and the main LAN, as well as the Internet. Additionally I configured the DHCP server on the “Wi-Fi users” interface to dish out IP addresses in the separate subnet. I did a similar thing with another VLAN for our VoIP phones and IP CCTV cameras (to keep them isolated from the rest of the network).
My eventual VLAN/subnet setup was:
999- PPPoE10(192.168.10.0/24) - Wi-Fi users20(192.168.20.0/24) - VoIP30(192.168.30.0/24) - CCTV
More Stuff
Also worth considering is Snort IDS - an Intrusion Detection System. pfSense has a package for this that works really well. Additionally OpenVPN Server is particularly easy to set up with pfSense (IPSec & L2TP VPNs are also supported).
Additionally you might consider setting up DNS and DDNS using your own (sub)domain to make things a little neater.
Xbox One & NAT
Before I made the switch to pfSense and binned the BT router, I had a real nightmare supporting the requirement of my better half to run two Xbox One consoles with Open NAT (a particularly vague term that Microsoft and others use to describe a full-cone NAT situation, occasionally with the added requirement of static source port numbers). The static port numbers requirement basically means that the NAT must not rewrite source port numbers.
Most (all?) ISP-provided routers do not have the ability to disable this restriction on a per-rule basis. Thankfully pfSense does.
The solution in the end was to add an Outbound NAT rule for each Xbox console with the the Static Port option enabled. Easy. Other than that no further NAT configuration was required apart from permitting the consoles to forward ports via UPnP using approprate ACL rules in Services → UPnP & NAT-PMP → UPnP Access Control Lists.